CryoSPARC on McCleary
Getting CryoSPARC set up and running on the YCRC clusters is something of a task. This guide is meant for intermediate/advanced users. YCRC staff are working on a CryoSPARC application for Open OnDemand Until then, venture below at your own peril.
Install
Before you get started, you will need to request a license from Structura from their website. These instructions are somewhat modified from the official CryoSPARC documentation.
1. Set up Environment
First, log onto a GPU compute node, either as an interactive session or an Open Ondemand Remote Desktop. Remember to request a non-zero number of GPUs, using a partition like 'gpu' ('gpu_devel' is fine for initial cryosparc installation).
Then choose a location for installing the software, such as under your project directory.
export install_path=${HOME}/project/cryosparc
mkdir -p ${install_path}
2. Set up Directories, Download installers
export LICENSE_ID=Your-cryosparc-license-code-here

 #go get the installers
cd $install_path
curl -L https://get.cryosparc.com/download/master-latest/$LICENSE_ID -o cryosparc_master.tar.gz
curl -L https://get.cryosparc.com/download/worker-latest/$LICENSE_ID -o cryosparc_worker.tar.gz

tar -xf cryosparc_master.tar.gz
tar -xf cryosparc_worker.tar.gz
3. Install the Standalone Server/Worker
# Load a cluster CUDA module

cd ${install_path}/cryosparc_master
module load CUDA/12.0.0
export cuda_path=${EBROOTCUDA}

# Set a temporary password
export cryosparc_passwd=Password123

export db_path=${install_path}/cryosparc_database
export worker_path=${install_path}/cryosparc_worker
export ssd_path=/tmp/${USER}
mkdir $ssd_path
export user_email="Your email address"

# Run the installation script
cd ${install_path}/cryosparc_master

./install.sh --standalone \
--license $LICENSE_ID \
--worker_path $worker_path \
--ssdpath $ssd_path \
--initial_email $user_email \
--initial_password $cryosparc_passwd \
--initial_username ${USER} \
--initial_firstname "Firstname" \
--initial_lastname "Lastname"
Warning
If the installer prompts you with, i.e., 'Add bin directory to your ~/.bashrc ?', be sure to answer yes.
Otherwise, you will get a 'command not found' error when you try to run cryosparc.
Warning
If you are installing a version of CryoSPARC older than 4.4.0, add the additional line
--cudapath $cuda_path \
after the --ssdpath line.
# Set location of CryoSPARC executables
source ~/.bashrc
4. Test
The installation process will normally attempt to launch CryoSPARC automatically. Check its status and launch manually if need be.
cryosparcm status
cryosparcm start (if not running)
If everything is running, you should be able to launch Firefox and see the CryoSPARC login interface at http://localhost:39000.
When you are done testing, shut down CryoSPARC,
cryosparcm stop
and exit your interactive session.
Run
There are two approaches to running CryoSPARC for data processing: directly in an interactive session as above, and in a remote session controlled by a batch script. Due to the current time limitations on the interactive public partitions, it is recommended to use the batch script method. If you are running in the pi_cryoem or pi_tomography partition, you have a longer interactive time limit, but the batch script method is still preferable, as it cleans up the CryoSPARC session automatically.
You are not guaranteed to get the same GPU node every time, so you need to set CryoSPARC to use whichever one you are running on. The first step in the following directions reconfigures the node name to match the current compute node.
1. Submit a batch script
The following batch script template illustrates how to set up a remote CryoSPARC session. By default, it will create an output file whose name contains the compute node that CryoSPARC has been launched on.
a. Copy the batch script template below into a file in the desired directory on the cluster.
#!/bin/bash
#SBATCH --partition=gpu
#SBATCH --time=2-00:00:00
#SBATCH --mem=64G
#SBATCH -N 1 -c 8
#SBATCH --gpus=4
#SBATCH --signal=B:10@60 # send the signal '10' at 60s before job finishes
#SBATCH --job-name=CryoSPARC-batch
#SBATCH --output="cryosparc-%N-%j.out"

function cleanup()
{
    date
    echo -n "Shutting down CryoSPARC @ "; date
    cryosparcm start
    cryosparcm cli "remove_scheduler_target_node('$worker_host')"
    cryosparcm stop
    echo "Done"
}

# Shut down CryoSPARC cleanly when timeout is imminent
trap cleanup 10

# Shut down CryoSPARC cleanly when scancel is invoked
trap cleanup 15

mkdir /tmp/${USER}
export master_host=$(hostname)
export worker_host=$(hostname)
export base_dir=$(dirname "$(dirname "$(which cryosparcm)")")

sed -i.bak 's/export CRYOSPARC_MASTER_HOSTNAME.*$/export CRYOSPARC_MASTER_HOSTNAME=\"'"$master_host"'\"/g' $base_dir/config.sh

source $base_dir/config.sh

cryosparcm start

# Forcibly add the current node as a worker
cryosparcw connect \
        --worker $worker_host \
        --master $master_host \
        --port 39000 \
        --ssdpath /tmp/${USER} \
        --cpus $SLURM_CPUS_PER_TASK

sleep infinity &
wait
b. Adjust the script contents as desired for memory, CPU, time, and partition.
c. Submit the script to SLURM.
sbatch YourScriptName
d. Check the contents of the job output file to make sure that CryoSPARC has launched.
e. In an Open OnDemand Remote Desktop session, open the Firefox web browser, and enter the name of the compute node your batch job is running on
(obtainable from the output filename, or from squeue).
http://YourComputeNode:39000
This should present you with the CryoSPARC login screen.
f. You can exit your Remote Desktop session without terminating CryoSPARC, and reconnect to your CryoSPARC instance later.
g. CryoSPARC will shut down automatically when time runs out. If you want to stop it before this, simply cancel the batch job.
scancel YourJobID
2. Relaunching in an interactive session (not generally recommended, as noted above)
Once you have started a new GPU node session,
mkdir -p /tmp/${USER}
export master_host=$(hostname)
export worker_host=$(hostname)
export base_dir=$(dirname "$(dirname "$(which cryosparcm)")")

sed -i.bak 's/export CRYOSPARC_MASTER_HOSTNAME.*$/export CRYOSPARC_MASTER_HOSTNAME=\"'"$master_host"'\"/g' $base_dir/config.sh

source $base_dir/config.sh

cryosparcm start

# Forcibly add the current node as a worker
cryosparcw connect \
        --worker $worker_host \
        --master $master_host \
        --port 39000 \
        --ssdpath /tmp/${USER} \
        --cpus $SLURM_CPUS_PER_TASK
and then connect to https://localhost:39000 as above.
Among other things, this will not perform the automatic cleanup of CryoSPARC lockfiles or of previous worker nodes, so you will want to manually run shutdown and worker removal when you are done with CryoSPARC:
cryosparcm cli "remove_scheduler_target_node('$worker_host')"
cryosparcm stop
Running on multiple nodes
In principle, you can request multiple nodes for your job session, and configure CryoSPARC to use additional nodes as worker nodes. Contact YCRC staff for assistance.
Topaz support (Optional)
Topaz is a pipeline for particle picking in cryo-electron microscopy images using convolutional neural networks. It can optionally be used from inside CryoSPARC using our cluster module.
1. In an interactive cluster session, load the desired Topaz module and determine the location of the executable; e.g.,
module load topaz/0.2.5.20240417-foss-2022b-CUDA-12.0.0
which topaz
/vast/palmer/apps/avx2/software/topaz/0.2.5.20240417-foss-2022b-CUDA-12.0.0/bin/topaz
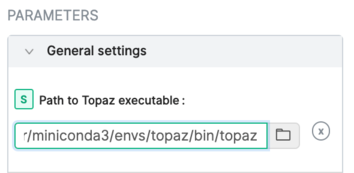
2. In a running CryoSPARC instance, add this executable to the General settings:
3. Consult the CryoSPARC guide
for details on using Topaz with CryoSPARC.
Troubleshoot
If you are unable to start a new CryoSPARC instance, the likeliest reason is leftover files from a previous run that was not shut down properly. Check /tmp and /tmp/${USER} for the existence of a cryosparc.sock file or a mongo.sock file. If they are owned by you, you can just remove them, and CryoSPARC should start normally. If they are not owned by you, and you have reserved the GPUs, then it is likely due to another user's interrupted job. Contact YCRC staff for assistance.
If your database won't start and you're sure there isn't another server running, you can remove lock files and try again.
# rm -f $CRYOSPARC_DB_PATH/WiredTiger.lock $CRYOSPARC_DB_PATH/mongod.lock