CryoSPARC on the YCRC Clusters
CryoSPARC is widely used and powerful structural biology tool. The YCRC has developed a workflow to facilitate use of this software on our clusters. Instructions on how to install and use cryoSPARC on YCRC clusters are given below.
(June 2026): We have newly streamlined our cryoSPARC workflow, both for installation and running the app.
Note
CryoSPARC can be tricky to debug. If/when you encounter problems, please check our growing list of troubleshooting tips that are shared at the bottom of this page. Please do not hesitate to contact us if you encounter difficulties running this program.
Set Up/Install
To operate cryoSPARC on a YCRC cluster, please use our installer script following the steps below. This automates the procedure described in the official cryoSPARC documentation, and integrates the installation within our YCRC HPC framework.
Please do steps 1 and 2 below right away, as they are quick and easy, and it could take up to a day to get the needed responses.
If you have already installed cryoSPARC : Skip step 1. When you do step 2, you may be notified that a 'YCRC cryoSPARC port' has been requested. If so, it is fine to use your old workflow in the meantime, while you wait for email notification that your port has been assigned.
-
Request a cryoSPARC License : Visit the Structura website and fill out the License Request Form.
-
Request a YCRC cryoSPARC Port Number : Start a terminal shell on the desired cluster (login node is fine, no need to use a compute node) and paste the following command:
/apps/services/cryosparc/ycrc_get_cryosparc_port.sh- A message will be printed, confirming that an email request has been sent to the YCRC. We will do the assignment by the next working day, and you will be automatically notified by email when this is completed.
-
Run the Setup/Install Script : Once you have received your cryoSPARC license and YCRC port number, run the installer by pasting the following command in a cluster terminal (again, login node is fine):
/apps/services/cryosparc/ycrc_prepare_cryosparc.sh-
If the cryoSPARC software is not already installed in your HPC account, you will be prompted for your cryoSPARC license. A pair of batch jobs will then be launched in the background, and helpful info printed. You will receive confirmation emails upon completion of the jobs.
-
If cryoSPARC is already installed, this step just makes available the helper script
ycrc_launch_cryosparc.shand finishes very quickly. It's ok to runycrc_prepare_cryosparc.sheven while running a job with your old cryoSPARC workflow. Just be aware the new workflow won't be able to run until the old cryoSPARC job has finished. -
If the installation fails, for example if you do not have enough space available in your project account, please contact us for assistance.
Note
Older cryoSPARC versions : Please note that our script installs the latest version of cryoSPARC. If you wish to use an older version of CryoSPARC, please follow these instructions to downgrade cryoSPARC after the YCRC installation script has finished.
-
Launch CryoSPARC and connect to the GUI
After you run the above setup/install script, run our helper script ycrc_launch_cryosparc.sh (see below for specific instructions). The script will submit a cryoSPARC batch job and then print instructions on how to connect to the cryoSPARC GUI.
Note
By default, ycrc_launch_cryosparc.sh sets a 6-hour time limit for your workflow and runs the main cryoSPARC process on the devel partition. To customize for longer workflows, add '--partition' and '--time' slurm options to the command line when running this script. However, please do not request GPU's- these are only used in batch jobs spawned by the main cryoSPARC process. Example:
ycrc_launch_cryosparc.sh --time 3-00:00:00 --partition week --mail-user=your.email@yale.edu
Choose between the following two methods to connect to the cryoSPARC GUI:
Option A: Connect via Local Web Browser. Start a cluster login node terminal shell, and then run ycrc_launch_cryosparc.sh. Follow the printed instructions to connect your local browser to the cluster with SSH, and then open the listed cryoSPARC GUI web address.
Option B: Connect via Remote Desktop. Launch a minimal OnDemand Remote Desktop session (we suggest the following options: devel partition with 1 CPU, 8 GB RAM, up to 6 hours runtime). Then run ycrc_launch_cryosparc.sh from a terminal window within the desktop environment. Once cryoSPARC starts running, the GUI will automatically open in firefox.
Info
-
Use your Yale email and 'Password123' (installer default password) to log onto the cryoSPARC GUI.
-
Note that these methods have different pros and cons. While option A provides a more fluid and seamless interface, option B may be more reliable under certain circumstances.
-
Also note that once cryoSPARC has started, you may close Remote Desktop sessions and browser windows at any time; your cryoSPARC jobs will continue undisturbed. Thereafter, reconnect to the cryoSPARC GUI by running
ycrc_launch_cryosparc.shagain, using either of options A or B. -
For more detailed connection info and instructions, use
ycrc_launch_cryosparc.sh -v.
Run CryoSPARC Jobs
-
Submit job : Once you start the cryoSPARC job submission process by clicking on
Submit jobin the job builder, the cryosparc GUI will prompt you to choose a compute lane that individual jobs will be submitted to. YCRC has set up the following lanes for your use:cpu,gpu,gpu_develas well aspriority_cpuandpriority_gpuif you have purchased priority tier access. -
Specify the job runtime (important): after selecting the compute lane, you must explicitly give a suitable slurm runtime. Currently this option is hidden at the bottom of the submission pane (tab on the right-hand side of the window, titled
Queue P*xxx* J*xxx*). Click on the purple box beneath your selected compute lane, labeledCluster submission script variables. The box will expand to reveal two additional options. Click onMaximum runtimeand give your value in hours:minutes:seconds format (i.e. 1:00:00).Note
The runtime should be generous, otherwise your job may be terminated prematurely; on the other hand, if you significantly overestimate the runtime, this may cause delays in when your job actually starts running. You may need to experiment to get a sense of what works best for your particular use cases. Please share any info you learn on this, so we can help make cryoSPARC easier for users to manage.
-
Optionally specify a 'memory multiplier' : When cryoSPARC submits your job to slurm, it will try to guess the amount of memory required; however, for certain job types we have found that this guess can underestimate the memory requirements, leading to out-of-memory failures that cause jobs to crash unexpectedly.
-
To diagnose, go to the OnDemand User Portal, click on 'Job Overview' on the left and then select an appropriate time period from the blue drop-down menu box at the top. Locate your job 'cryosparc_Pxx_Jxxx' from the list of jobs, and check for 'OUT_OF_MEMORY' under the 'State' column.
-
If this was the problem, set the
RAM multiplierto a value larger than one; a value of 4 is quite conservative and should almost always work, while 2 may suffice for many cases.RAM multiplieris found in theCluster submission script variablespurple expansion box along withMaximum runtime(described above). -
CryoSPARC may be particularly susceptible to this problem when analyzing very many particles (i.e. multiple millions) and/or large box sizes (i.e. dimensions of 768x768).
-
Job types where we have seen this problem include: '2D Classification', '2D Template Matching', 'Local Refinement', and 'Ab-Initio Reconstruction'
-
-
Click 'Submit to lane' : the YCRC slurm scheduler will assign your task to an available compute node. It will be helpful to monitor your job not only in the cryoSPARC GUI, but also using the YCRC slurm tools (i.e. 'User Portal' from the OOD Utilities menu, or the terminal command
squeue --me).- Note, if you change your mind about job runtime after you submit to a lane, but before it starts running, you may use the following bash terminal command to adjust it, for example:
scontrol update JobId=1234567 TimeLimit=6:00:00You may also use slurm to change the partition a job runs in (again, you need to do this before the job starts running):
scontrol update JobId=1234567 Partition=priority_gpu
Add Topaz
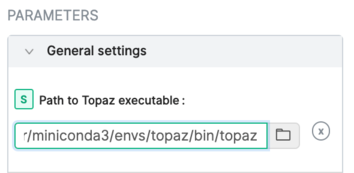
Topaz is a pipeline for particle picking in cryo-electron microscopy images using convolutional neural networks. It can optionally be used from inside cryoSPARC using our cluster module.
-
In a running cryoSPARC instance, add the executable '/apps/services/cryosparc/topaz.sh' to the General settings :
-
Consult the cryoSPARC guide for details on using Topaz with CryoSPARC.
Troubleshooting
Unfortunately, information needed to diagnose cryoSPARC job failures in cluster lanes can be a bit tedious to track down. Luckily, we have found that most job failures have simple explanations and solutions. Listed below are notes on how to solve some of the more common problems.
CryoSPARC job issues
-
Insufficient runtime : As noted in Run CryoSPARC Jobs you must specify the job runtime. However, this step is easy to overlook; moreover, your job may still run out of time if your specified runtime was not conservative enough.
- To diagnose, go to the OnDemand User Portal, click on 'Job Overview' on the left and then select an appropriate time period from the blue drop-down menu box at the top. Locate your job 'cryosparc_Pxx_Jxxx' from the list of jobs. If you see 'TIMEOUT' under the 'State' column, try increasing the job runtime.
-
Insufficient memory : this is probably most common source of cryoSPARC job failures, other than not specifying enough runtime. Unfortunately, cryoSPARC itself provides little or no diagnostic information on this type of problem. If you do not see an obvious source for the job failure within cryoSPARC, the cause is likely insufficient memory. Please see 'Optionally specify a memory multiplier' under Run CryoSPARC Jobs for details on how to diagnose and fix this.
-
Resource requests do not match the requested partition : if you see a
Job violates accounting/QOS policyerror message and/or a job submission fails immediately (before the process even starts running) this indicates the requested job runtime (or, possibly, memory) may exceed the allowed user limit in a given partition. To fix, switch partitions or change theMaximum runtimeparameter (see above sections under Run CryoSPARC Jobs). -
Drilling down further : Within the cryoSPARC interface, find the job location (located in a text box) and copy it by clicking on it. Then, in a terminal, navigate to this folder where you will find a number of useful files, including log files (i.e.,
P1_J2_slurm.log,P1_J2_slurm.err,job.log) and also a copy of the slurm submission script (queue_sub_script.sh). A useful debugging technique is to create a copy of queue_sub_script.sh outside the job folder, edit and manually submit it. If the target YCRC partition is busy, you can accelerate your diagnosis by giving the script 'lightweight' slurm parameters and specifying the gpu_devel partition. In this way you can quickly get the job started on slurm, allowing trivial errors to be quickly spotted. -
Mismatch between cryoSPARC and GPU/CUDA Newer graphics cards being installed on the Bouchet cluster are incompatible with cryoSPARC versions prior to 5.0.0. This can cause certain jobs (but not all) GPU-dependent jobs to crash. The solution is to upgrade your cryoSPARC to version >= 5.0.0
-
CryoSPARC installation bug: One of our users experienced a issue where cryoSPARC GPU jobs uniformly crashed on startup, failing with a cryptic Python error. We have found a way fix this problem by patching the cryoSPARC python libraries (a buggy CUDA version compatibility check).
General CryoSPARC issues
-
Database corruption : Occasionally a crash or other interrupted task may damage cryoSPARC's 'mongo' database. If it cannot be repaired, you can make use of our daily project folder snapshots to restore a previous version of the
cryosparc_databasefolder from the past several days. This can avoid a long and painful troubleshooting process with minimal loss of work.cd $(dirname "$(dirname "$(dirname "$(which cryosparcm)")")") mv cryosparc_database cryosparc_database_corrupt # Now substitute, i.e., snapshot_2026-06-02_17_00_00_UTC for <good_backup_date> in the command below: cp -a "../.snapshot/<good_backup_date>/cryosparc/cryosparc_database" . -
Browser issues : Firefox's cache files can become corrupted under certain circumstances (i.e. browser crash) leading to a blank screen when visiting the cryoSPARC GUI page. This can be fixed by resetting Firefox's history and cache data for the page. To do this, open firefox and then:
- Select
Manage history(click on the Firefox hamburger menu at the window upper right, then clickHistory->Manage History) - Click on the search box and type
ycrc.yale.edu - Right click on any cryoSPARC history entries, select
Forget About This Site..., then clickForget - Repeat until there are no more cryoSPARC entries left
- Close the history window and select
Settingsfrom the Firefox hamburger menu - Click
Privacy & Security, scroll down toCookies and Site Data, and clickManage Data... - If you see any remaining cryoSPARC entries, click on them and select
Remove Selected, thenSave Changes - Quit and restart firefox ; hopefully you can now successfully load the cryoSPARC page
- If this doesn't work the first time, repeating the above steps one or two times more may still resolve the issue
- Select
-
Leftover lock files : If your submitted cryoSPARC master job is running but unable to start a new CryoSPARC instance, the likeliest reason is leftover files from a previous run that was not shut down properly. Login to the compute node of your cryoSPARC master job and check if cryoSPARC is running with
cryosparcm status, and check your cryoSPARC master cluster logfile for errors related to the cryoSPARC data base and/or 'mongo'. If a cryosparcm has failed to run and/or you see signs of a database problem, check /tmp and /tmp/${USER} on the compute node for the existence of acryosparc*.sockfile or amongo*.sockfile. If they are owned by you, you can just remove them and restart the cryoSPARC master process withcryosparcm start. If these files are present but are not owned by you, then it is likely due to another user's interrupted job. Contact YCRC staff for assistance.If your database won't start and you're sure there isn't another server running, you can remove lock files and try again.
# source $(dirname "$(dirname "$(which cryosparcm)")")/config.sh
# rm -f $CRYOSPARC_DB_PATH/WiredTiger.lock $CRYOSPARC_DB_PATH/mongod.lock