SSH Connection
For more advanced use cases that are not well supported by the Web Portal (Open OnDemand), you can connect to the cluster over the more traditional SSH connection.
Overview
-
Request an account (if you do not already have one).
-
Send us your public SSH key with our SSH key uploader. Allow up to ten minutes for it to propagate.
-
Once we have your public key you can connect with
ssh netid@clustername.ycrc.yale.edu. -
Login node addresses and other details of the clusters, such as scheduler partitions and storage, can be found on the clusters page.
-
To use graphical programs on the clusters, please see our guides on Open OnDemand or X11 Forwarding.
If you are having trouble logging in: please read the rest of this page and our Troubleshoot Login page, then contact us if you're still having issues.
What are SSH keys
SSH (Secure Shell) keys are a set of two pieces of information that you use to identify yourself and encrypt communication to and from a server. Usually this takes the form of two files: a public key (often saved as id_ed25519.pub) and a private key (id_ed25519 or id_rsa.ppk). To use an analogy, your public key is like a lock and your private key is what unlocks it. It is ok for others to see the lock (public key), but anyone who knows the private key can open your lock (and impersonate you).
When you connect to a remote server in order to sign in, it will present your lock. You prove your identity by unlocking it with your secret key. As you continue communicating with the remote server, the data sent to you is also locked with your public key such that only you can unlock it with your private key.
We use an automated system to distribute your public key onto the clusters, which you can log in to here. It is only accessible on campus or through the Yale VPN. All the public keys that are authorized to your account are stored in the file ~/.ssh/authorized_keys on the clusters you have been given access to. If you use multiple computers, you can either keep the same ssh key pair on every one or have a different set for each. Having only one is less complicated, but if your key pair is compromised you have to be worried about everywhere it is authorized.
Warning
Keep your private keys private! Anyone who has them can assume your identity on any server where your keys are authorized. We will never ask for your private key.
For further reading we recommend starting with the Wikipedia articles about public-key cryptography and challenge-response authentication.
macOS and Linux
Generate Your Key Pair on macOS and Linux
To generate a new key pair, first open a terminal/xterm session. If you are on macOS, open Applications -> Utilities -> Terminal.
Generate your public and private ssh keys. Type the following into the terminal window:
ssh-keygen
Your terminal should respond:
Generating public/private ed25519 key pair.
Enter file in which to save the key (/home/yourusername/.ssh/id_ed25519):
Press Enter to accept the default value. Your terminal should respond:
Enter passphrase (empty for no passphrase):
Choose a secure passphrase. Your passphrase will prevent access to your account in the event your private key is stolen. You will not see any characters appear on the screen as you type. The response will be:
Enter same passphrase again:
Enter the passphrase again. The key pair is generated and written to a directory called .ssh in your home directory. The public key is stored in ~/.ssh/id_ed25519.pub. If you forget your passphrase, it cannot be recovered. Instead, you will need to generate and upload a new SSH key pair.
Next, upload your public SSH key on the cluster. Run the following command in a terminal:
cat ~/.ssh/id_ed25519.pub
Copy and paste the output to our SSH key uploader. Note: It can take a few minutes for newly uploaded keys to sync out to the clusters so your login may not work immediately.
Connect on macOS and Linux
Once your key has been copied to the appropriate places on the clusters, you can log in with the command:
ssh netid@clustername.ycrc.yale.edu
Check out our Advanced SSH Configuration for tips on maintaining connections and adding tab complete to your ssh commands on linux/macOS.
Windows
We recommend using the Web Portal (Open OnDemand) to connect to the clusters from Windows. If you need advanced features beyond the web portal, we recommend using MobaXterm.
MobaXterm
You can download, extract & install MobaXterm from this page. We recommend using the "Installer Edition", but make sure to extract the zip file before running the installer.
You can also use one of the Windows Subsystem for Linux (WSL) distributions and follow the Linux instructions above. However, you will probably run into issues if you try to use any graphical applications.
Generate Your Key Pair on Windows
First, generate an SSH key pair if you haven't already:
- Open MobaXterm.
- From the top menu choose Tools -> MobaKeyGen (SSH key generator).
- Leave all defaults and click the "Generate" button.
- Wiggle your mouse.
- Click "Save public key" and save your public key as id_rsa.pub.
- Choose a secure passphrase and enter into the two relevant fields. Your passphrase will prevent access to your account in the event your private key is stolen.
- Click "Save private key" and save your private key as id_rsa.ppk (this one is secret, don't give it to other people).
- Copy the text of your public key and paste it into the text box in our SSH key uploader.
- Your key will be synced out to the clusters in a few minutes.
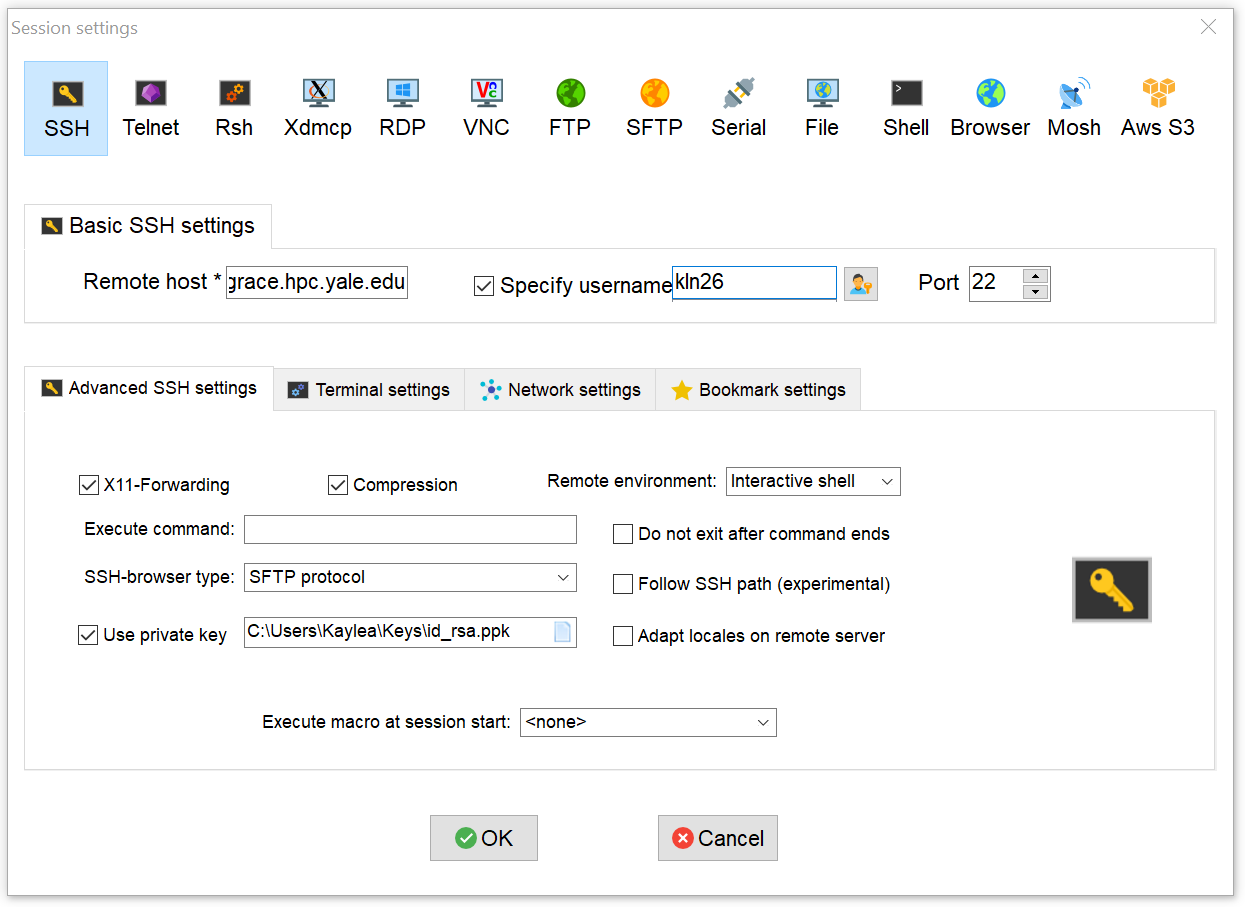
Connect with MobaXterm
To make a new connection to one of the clusters:
- Open MobaXterm.
- From the top menu select Sessions -> New Session.
- Click the SSH icon in the top left.
- Enter the cluster login node address (e.g. grace.ycrc.yale.edu) as the Remote Host.
- Check "Specify Username" and Enter your netID as the the username.
- Click the "Advanced SSH Settings" tab and check the "Use private key box", then click the file icon / magnifying glass to choose where you saved your private key (id_rsa.ppk).
- Click OK.
In the future, your session should be saved in the sessions bar on the left in the main window.